Servos
The Servos tab configures each servo: center point, travel limits/endpoints, and direction (reversing), on top of whatever mixing rules send input to it.
There are 24 servos. Servo N is sent on PWM output N, where the board has one, and on channel N of a bus output (SBUS, F.Bus) when one is set up, so a servo is set up the same way however it is wired. The table lists the servos in use; see Bus Servos.
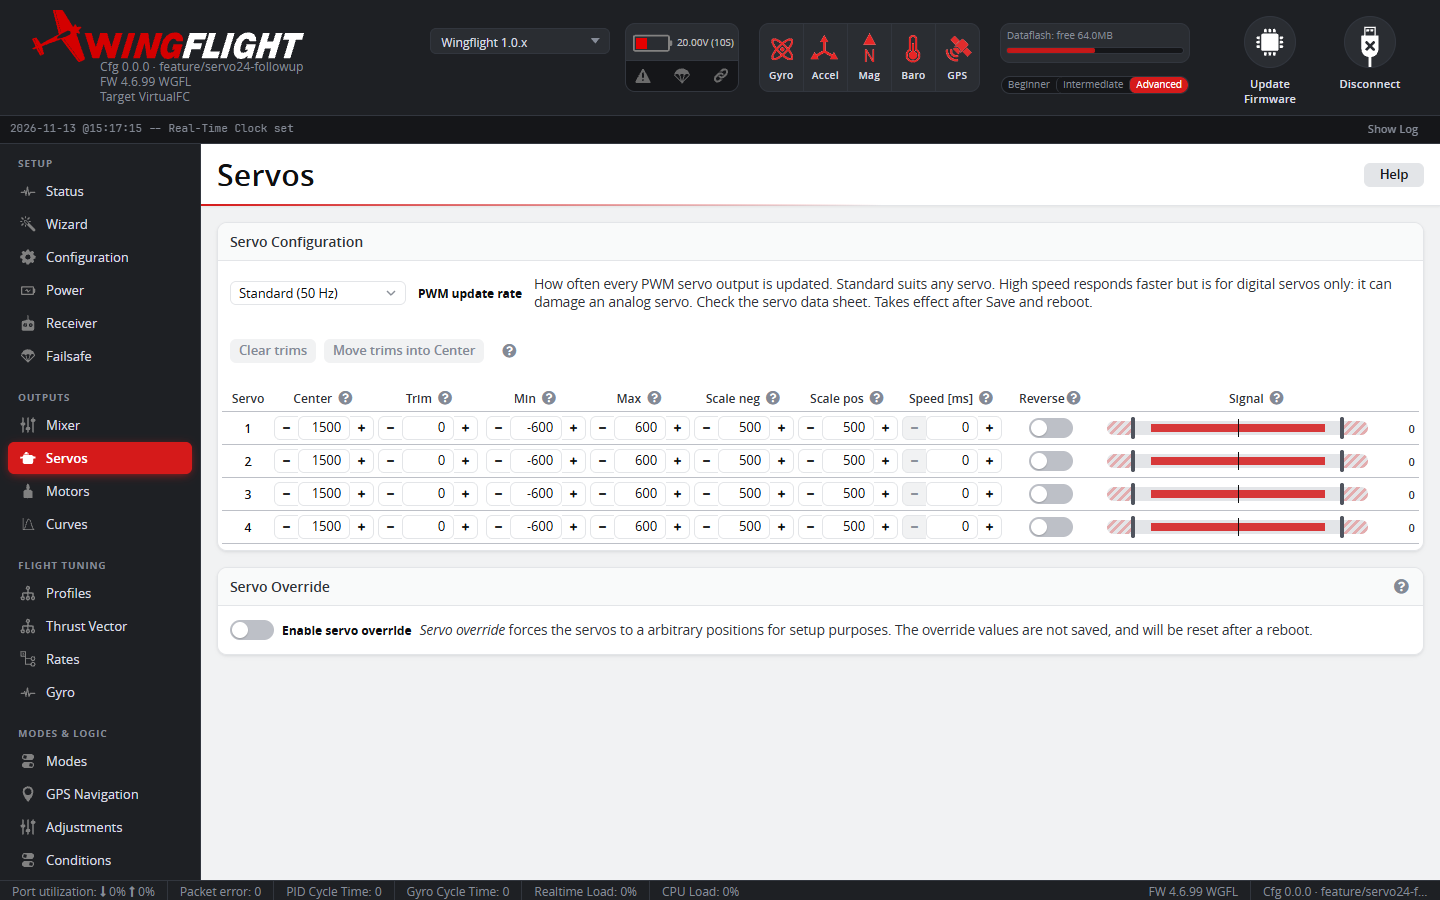
Set servo endpoints conservatively at first -- it's easier to increase travel once you've confirmed nothing binds mechanically at the extremes than to diagnose a stalled/straining servo after the fact.
Name
Each servo can have a short Name, such as L AIL or ELEV, so you can
tell the servos apart without counting outputs. A name is up to 8
characters (letters, digits, spaces and punctuation). It is saved on the
flight controller and kept in a CLI backup, but nothing in flight uses it.
The column only shows with firmware that supports names.
The Mixer tab, the Setup Wizard, Servo Override and Balance show the name
with the servo number, for example Servo #1 (L AIL). When a mixer setup
(the Mixer tab's model setup or the Setup Wizard's airframe step) assigns
the surfaces, it names those servos for you: L AIL / R AIL, ELEV,
RUDDER, L FLAP / R FLAP, L ELEVON, L VTAIL and so on. A name it
gave earlier to a servo the new mix no longer uses is cleared; a name you
typed there is kept.
The Ethos Lua suite shows and edits the names too, and its Setup Wizard names the servos the same way. The EdgeTX scripts show them but can't edit them.
Endpoints and scale
Min/Max cap the servo's actual pulse-width travel, to keep the arm off a mechanical stop at either extreme. Scale Neg/Scale Pos are a separate pair of per-side scaling factors (500μs by default) -- adjust these instead of Min/Max specifically to correct a servo that throws noticeably further on one side than the other.
The limits are the same for every servo, on a PWM output and on a bus:
| Field | Range | Default |
|---|---|---|
| Center | 1000-2000 µs | 1500 µs |
| Min / Max | down to 880 µs / up to 2159 µs | 600 µs either side of Center |
| Scale Neg / Scale Pos | 50-1000 µs | 500 µs |
880-2159 µs is everything an SBUS or F.Bus channel can carry. Narrow-band servos (760 µs center) are not supported.
PWM update rate
PWM update rate, above the table, is how often every PWM output is updated. It is one setting for all of them:
- Standard (50 Hz) -- the default, and safe for any servo.
- High speed (333 Hz) -- responds faster, but is for digital servos only. It can damage an analog servo, so check the data sheet first.
It only takes effect after Save and reboot, since the rate is set up at
boot time, not applied live like most other fields here. It doesn't affect
bus outputs, which run at their own frame rate. The CLI setting is
servo_pwm_rate, 25-333 Hz; a value other than 50 or 333 is shown here as
it is.
Speed and Reverse
Speed limits how fast the servo is allowed to move, expressed as milliseconds needed for a 60° rotation -- 0 means unlimited. Useful for deliberately slowing a specific output (e.g. retracts) independent of the Mixer rule's own Speed limit on the same output.
Reverse flips direction if a surface moves the wrong way -- check Mixer rule polarity first if only one of several surfaces on the same axis is backwards, since Reverse here and a rule's own Reverse checkbox both flip the same thing from different places.
Balance Curve
When two servos drive the same surface (dual ailerons, split flaps) and don't quite track each other, a per-servo balance curve trims one servo's travel to match its partner. Balance curves are edited on the Curves tab, not here. Any servo with a non-flat curve shows a curve icon in its row; click it to jump straight to that servo's curve.
Note
The Geometry Correction switch that older Configurator versions showed on this tab has been removed from the Configurator, so the correction can no longer be turned on or off from here.
Trim
Trim never changes a servo's Mid. Each servo has a separate Trim value in µs, added to its output on top of Mid. Mid and the Min/Max end stops you set on the bench stay where you put them, however much you trim.
The Trim column holds two kinds of trim:
- Saved trim -- set by a Stepped Servo Trim adjustment, by Auto Trim, or by typing it in here. It is saved like any other setting (on disarm, or with Save on this tab).
- Live trim -- set by a Mapped Servo Trim adjustment (a knob). It follows the knob, is never saved, and starts from zero every time the flight controller boots.
Both together are limited to 20% of the servo's Scale (the larger of Scale Neg and Scale Pos -- ±100 µs at the default 500 µs). The output also stays inside the servo's Min/Max, so trim can never drive a surface past the end stops you set.
How the column shows it:
- No Servo Trim adjustment for this servo: the saved trim, editable.
- A Servo Trim adjustment covers this servo: read-only, showing the trim
in use (saved plus live), so it moves as you turn the knob or flick the
switch. Hover over it to see the two parts. The switch or knob owns the
value, so it can't be typed over here. A badge beside it shows the
adjustment, highlighted while active with its channel, e.g.
R CH #9for roll on channel 9.
The Signal column's full-stick estimate allows for the saved trim: trim uses up travel on one side and gives it back on the other.
Clear trims and Move trims into Center
Above the table:
- Clear trims sets every saved trim to 0.
- Move trims into Center adds each servo's saved trim to its Mid and sets the trim to 0. The servo doesn't move, but Min/Max are measured from Mid, so the end stops move with it. Use it once you've trimmed the model out and want the result to become the new center -- and check the end stops afterwards.
Both count as unsaved changes until you press Save.
Trimming in flight
Map Servo Trim Roll, Servo Trim Pitch or Servo Trim Yaw on the Adjustments tab to trim from the transmitter:
- Stepped (a momentary switch): each press moves the saved trim by one Step. A quick tap counts. Hold the switch and it starts repeating after half a second. Only the first step of each press beeps. The trim is saved when you disarm.
- Mapped (a knob or channel position): sets the live trim directly, within the adjustment's range. It is never saved.
Trimming an axis moves every servo whose Mixer rule takes its input from that stabilized axis, not just one output. Each servo's Reverse, its rule's weight sign and the axis's Invert are taken into account, so two ailerons trim in opposite directions correctly. Servos fed by a raw RC channel, an override or a logic condition aren't touched -- the same rule Auto Trim uses. When any servo on the axis reaches its trim limit, the whole axis stops, so a pair of servos on one surface never get pulled out of line.
Because a Mapped trim is never saved, a knob that is misread -- for example a channel that isn't valid yet just after power-up -- can move a surface by at most the trim limit and leaves nothing behind once the reading is right again. The firmware also ignores a trim channel until the receiver link has been continuously present for a full second (both at power-up and after a brief link drop), so a channel that comes online later than the link itself can't pull a servo off center in that gap.
Stepped trims work on the bench too: the Trim column follows each press, and Save keeps the result.
In normal (stabilised) flight a trim press can seem to do nothing, because the stabiliser's I-term backs off by the same amount. The model only shows the difference in Manual or Passthrough. The Ethos Lua suite tells you when the stabiliser is holding trim and which way to trim ("Trim nose up", "Trim roll left", ...) until "Trim OK". See Out of trim.
Trim buttons on one channel
The radio's own trim buttons can drive Stepped trims on a single spare channel. The Setup Wizard's Trim and gain step sets this up (Trim buttons on one channel) and checks each button. The steps below use Ethos as the example; on other radios (EdgeTX, OpenTX, Jeti and so on) set up the same mix and weights, with each trim button as the switch for its mix line. By hand:
-
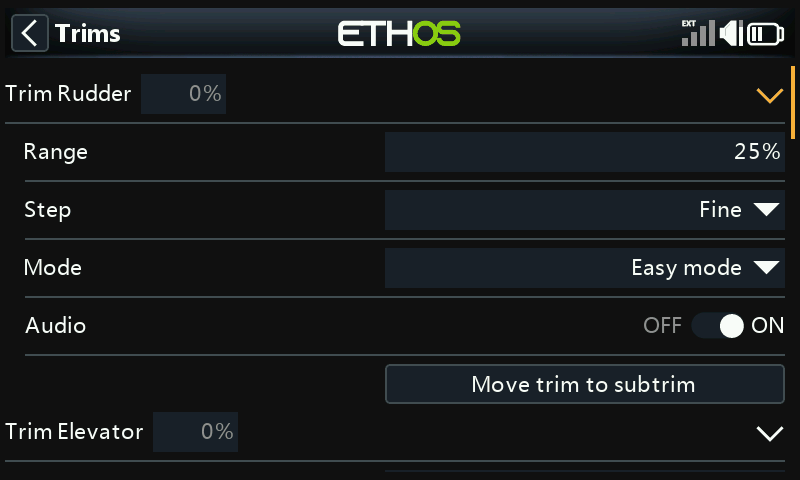
Model → Trims: leave the aileron, elevator and rudder trims enabled, with Audio on so each press clicks.
-
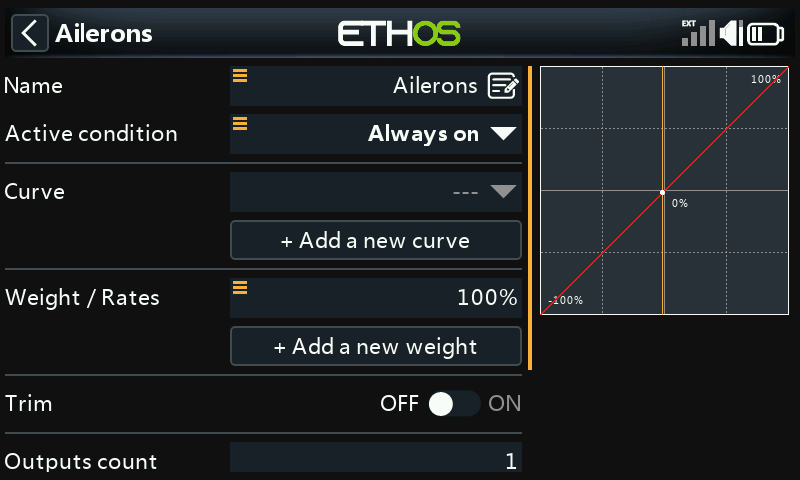
Model → Mixes: in the Ailerons, Elevator and Rudder mixes, turn Trim off. A trim left on a stick is read as stick input, which the stabilizer holds against.
-
Add a Free mix named TRIM: Always on, Source Maximum, Operation Add, Output a spare channel. Add an action per trim button, setting the mix weight:
Trim button Weight Channel Adjustment T1 Right (aileron) 80% 1885-1935 µs Servo Trim Roll, up T1 Left 70% 1835-1885 µs Servo Trim Roll, down T2 Up (elevator) 60% 1780-1835 µs Servo Trim Pitch, down T2 Down 50% 1730-1780 µs Servo Trim Pitch, up T4 Right (rudder) 40% 1680-1730 µs Servo Trim Yaw, up T4 Left 30% 1630-1680 µs Servo Trim Yaw, down 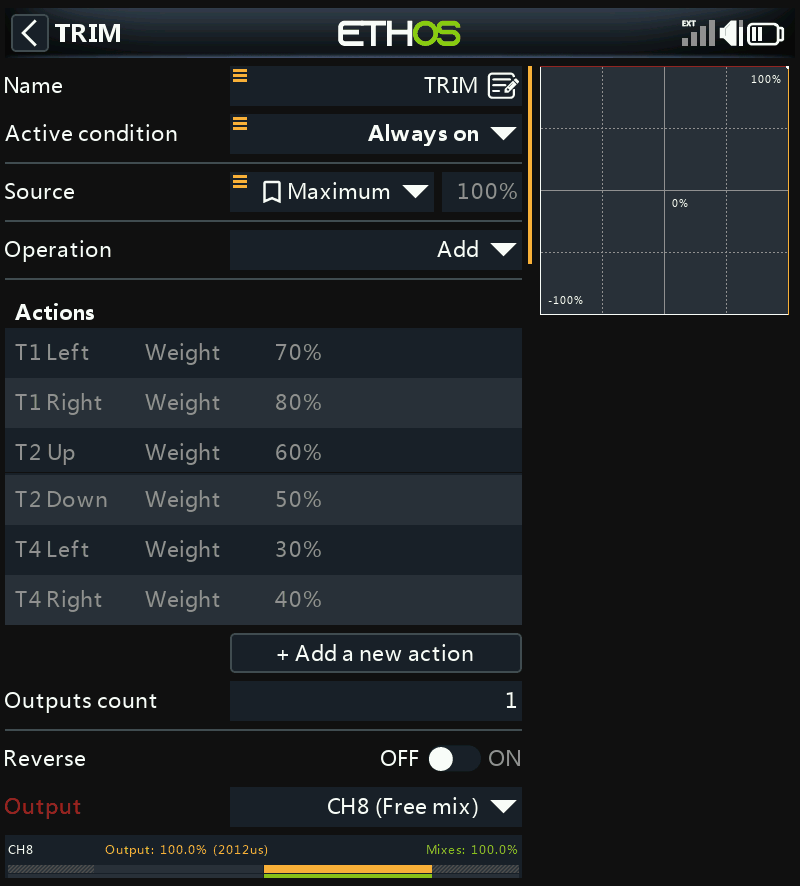
-
On the Adjustments tab, add Servo Trim Roll, Pitch and Yaw as Stepped, always on, all on that channel, with the channel windows above and a Step of 2 µs.
Each weight puts its own value on the channel (100% is 2012 µs), and the windows sit half-way between neighbouring buttons. With no button pressed, the channel reads outside all of them.
Upgrading from older firmware
Older firmware wrote Stepped trims and Auto Trim straight into Mid.
Anything trimmed that way stays in Mid after the upgrade, and the new
saved trims start at 0. In the CLI, servo trim lists the saved trims
and servo trim <servo> <µs> sets one; diff and dump include them.
Bus Servos
For FrSky XACT servos on one F.Bus wire, see FrSky Servos.
Enabling SBUS Output or FBUS Master on a serial port (see Configuration) sends the servos down that UART too, for digital bus servos wired to it instead of individual PWM wires. Servo N is channel N on the bus. It is the same servo as PWM output N, with the same Center, Min/Max, Scale, Trim, Speed and Reverse, so one Mixer rule and one row in the table drive both.
The table lists the servos in use: servo 1 up to the board's PWM output count or the bus channel count (see Bus output channel count), whichever is larger. A note above the table says which servos the bus sends and which are also on a PWM output. On a board with four PWM outputs and a 12-channel bus, for example, servos 1-12 are listed, all twelve go down the bus, and servos 1-4 are on the PWM outputs as well.
To send something on the bus that isn't on a PWM output, give it a servo number the board has no PWM output for.
Bus output channel count
How many channels each bus output sends is set with F.Bus output channels
and SBUS output channels, above the table. Each appears only when a
port has that output assigned. A change applies straight away, the table
resizes to match, and it is saved with the rest of this tab. The CLI settings are
fbus_master_channels and sbus_out_channels:
| Output | Channel counts | Default | Frame |
|---|---|---|---|
| F.Bus | 8, 12, 16, 24 | 24 | 8 uses the 8-channel frame, 12 and 16 the 16-channel frame, 24 the 24-channel frame |
| SBUS | 8, 12, 16 | 16 | Always the 16-channel SBUS frame |
Channels past the count are sent at center. Pick 16 or less for F.Bus if anything on the bus only accepts the 16-channel frame.
SBUS and F.Bus output can run at the same time, each with its own count. Servo N is channel N on both, and the table follows the larger of the two counts.
With a count of 16, channels 17 and 18 are also sent as on/off channels, driven by servos 17 and 18: on when that servo's output is at 1500 µs or above. Both are listed in the table. The 24-channel F.Bus frame has no on/off channels.
With a 24-channel F.Bus receiver, receiver channels 19-24 are available too (see Receiver), so they can be mixed straight to servos 19-24.
Upgrading from older firmware
Older firmware had separate PWM servos (S1-S8) and bus servos (S9 and up), with a Clone PWM outputs to bus servos switch, and a Rate for each servo. All of that is gone. Servo and mixer rule settings reset to their defaults on the upgrade. In a backup made before it, a line that names servo 9 or above meant a bus channel 8 lower than it does now: the Configurator leaves those lines out when it restores such a backup, and they must not be pasted back into the CLI as they are. Set those servos up again by hand.